Wooden Electric Generator
KITWG
Introduction
An electric generator is a device that converts mechanical energy to electrical energy. In a generator, a moving magnet will push the free electrons in a conductor back and forth. Movements of electrons along a conductor are called electricity.
Since in this type of electricity electrons swing back and forth, we also call it alternative electricity and show it with symbol AC. Home electricity is an AC electricity with frequency of about 50 Hertz, meaning electrons swing back and forth 50 times per second.
In a wooden generator, the main structure is made of wood. The only non-wooden parts are the magnet and the wire. This project combines mechanical engineering with electrical principles, making it perfect for students to understand how electricity is generated and used.
With this project students can explore:
- Electromagnetic induction principles
- How mechanical energy converts to electrical energy
- AC electricity and alternating current
- Basic circuit construction and LED technology
- Woodworking and assembly techniques
Materials Needed
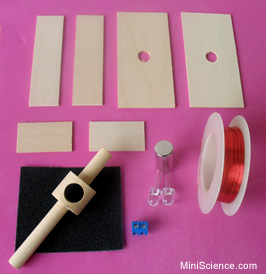
The Small Wooden Electric Generator Kit from MiniScience includes most of the materials you will need. Here is what comes in the kit and what you will need to provide:
Kit Contents
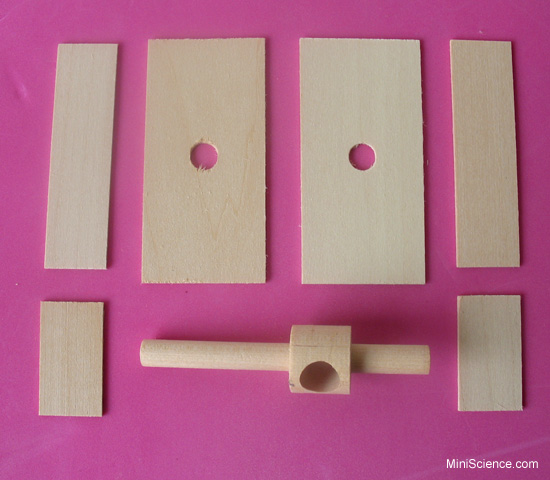
- Two bottom and top wood boards (90mm x 43mm x 1mm with 10mm hole)
- Two large side boards (83mm x 23mm x 1mm)
- Two small side boards (40mm x 23mm x 1mm)
- Rotor (wood dowel with hole for magnet)
- Strong magnet (13mm diameter)
- Spool of 200 feet magnet wire
- Two LED lamps
- Terminal block for wire connections
- Sand paper
Assembly Procedure
Follow these steps carefully to build your wooden electric generator:
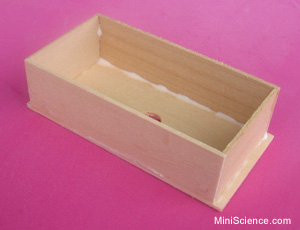
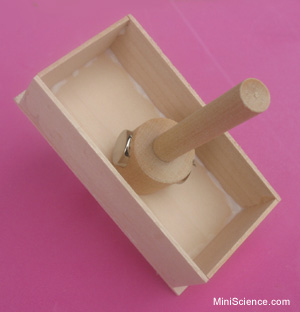
- Build the wooden box structure: Glue the bottom board to the side boards to create a rectangular box frame. Make sure all corners are square and aligned properly.
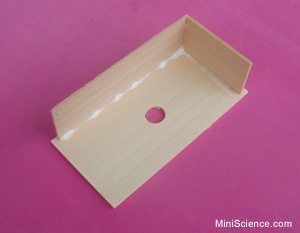
- Complete the box assembly: Attach the second long side board to complete the four-sided box structure. Ensure the rotor hole in the bottom is centered.
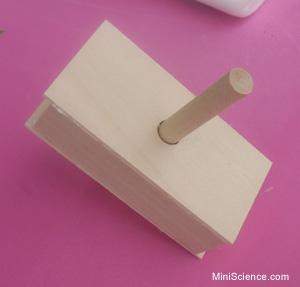
- Insert the magnet into the rotor: Place the strong magnet into the hole of the rotor wood dowel. The 13mm diameter should fit snugly. Use a small amount of glue if needed to secure it permanently.

- Insert the rotor assembly: Make sure the box glue is completely dry. Insert the rotor with the attached magnet through the bottom hole so the magnet is fully inside the box.
- Prepare to close the box: Apply glue to the top edges of the box in preparation for the top board.

- Close the box with top board: Place the top board while the rotor wood dowel goes through its hole. Lower the top board until it touches the glued edges. Make sure the rotor can spin freely.

- Final alignment and drying: While the glue is still wet, align all edges to ensure a perfect rectangular box. Verify the rotor spins freely, then allow the glue to dry completely.

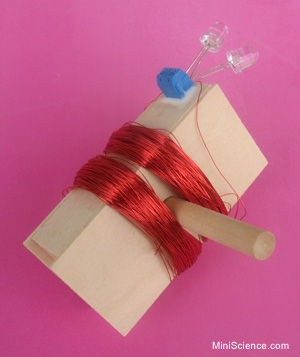
- Wrap the magnet wire: Leave about 15cm of wire loose, then begin wrapping around the box. Wrap at least 230 turns on one side of the wood dowel, then continue on the other side. Do not cut the wire or change direction while wrapping. This creates the coil that will generate electricity as the magnet rotates.
- Connect the LED and terminal block: Use the terminal block to securely connect the two ends of the magnet wire coil with the LED lamps. This allows you to test your generator and see the electricity you have created!
How It Works
Electromagnetic Induction: When you rotate the magnet inside the coil of wire, the magnetic field moves relative to the coil. This changing magnetic field induces an electric current in the wire. The faster you rotate the magnet, the stronger the electrical current.
Alternating Current (AC): As the magnet rotates, the magnetic field alternates direction relative to the coil. This causes the electrons to flow back and forth in the wire, creating alternating current, just like the electricity in your home.
Testing Your Generator: Spin the rotor by hand. If connected properly, the LED should light up, demonstrating that you have successfully converted mechanical energy into electrical energy!
Educational Concepts
This project teaches important STEM concepts:
- Physics: Electromagnetic induction, magnetism, electrical circuits
- Engineering: Mechanical design, assembly, and optimization
- Mathematics: Measurements, coil calculations, rotation speed
- Technology: LED operation, electrical connections, circuit principles
Extension Ideas
- Experiment with different rotation speeds and measure the LED brightness
- Use a voltmeter to measure the voltage generated at different speeds
- Try different numbers of wire turns and compare results
- Build a hand crank or wheel system to rotate the generator
- Connect multiple LEDs in series or parallel to explore circuit configurations
- Compare AC output with a rectifier circuit to create DC electricity
If you do not have this kit, you can order it now. The Small Wooden Electric Generator Kit is available as single pack and class pack.
Secure Online Store

Order Now
Product URL:
https://shop.miniscience.com/KITWG
MiniScience.com
1059 Main Avenue
Clifton, New Jersey 07011
Tel: (973) 777-3113