
Floating Rings Magnet Levitation Kits
KITFR · KITFRB · KITFRSG · KITFRBX
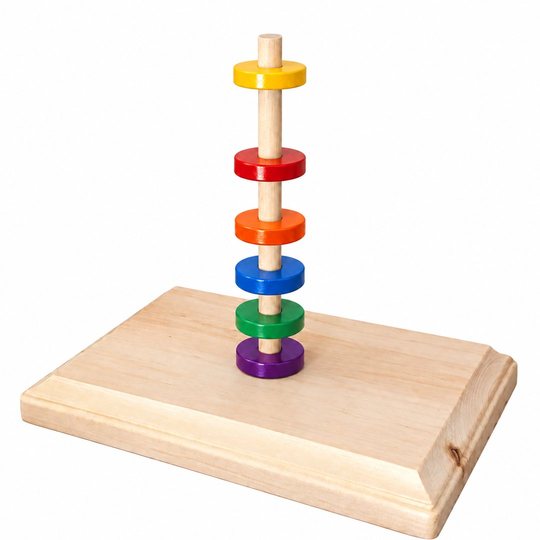 KITFR
Floating Rings Science Set
Colored magnetsImanes de colores
InstructionsInstrucciones
OrderOrdenar
KITFR
Floating Rings Science Set
Colored magnetsImanes de colores
InstructionsInstrucciones
OrderOrdenar
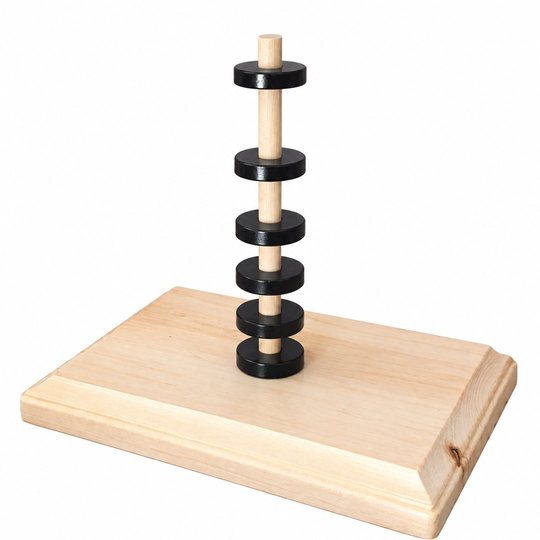 KITFRB
Floating Rings Science Set (Black Magnets)
Black magnetsImanes negros
InstructionsInstrucciones
OrderOrdenar
KITFRB
Floating Rings Science Set (Black Magnets)
Black magnetsImanes negros
InstructionsInstrucciones
OrderOrdenar
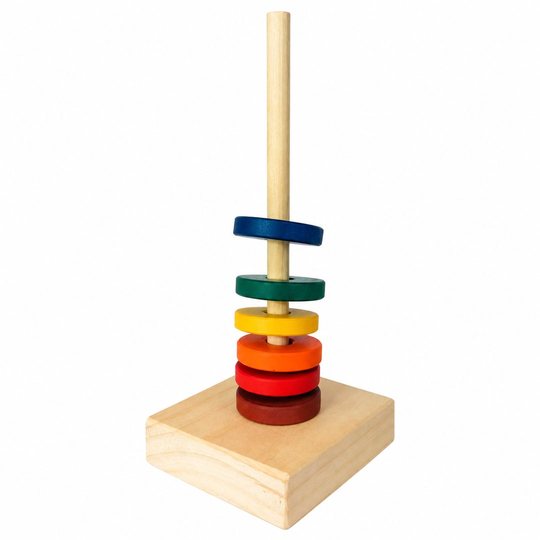 KITFRSG
Floating Rings Science Set (Student Grade)
Student grade, colored magnetsGrado estudiantil, imanes de colores
InstructionsInstrucciones
OrderOrdenar
KITFRSG
Floating Rings Science Set (Student Grade)
Student grade, colored magnetsGrado estudiantil, imanes de colores
InstructionsInstrucciones
OrderOrdenar
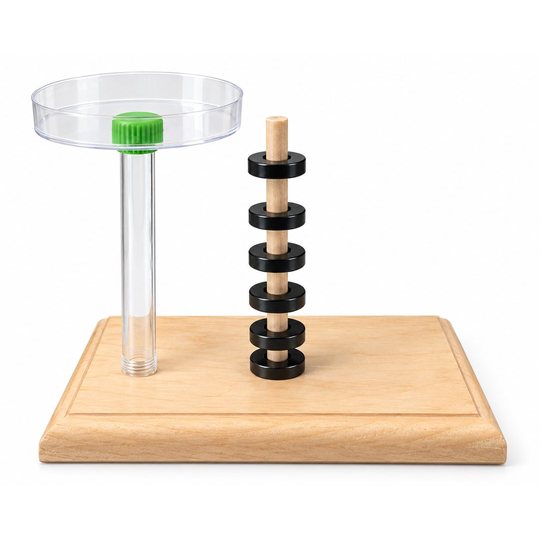 KITFRBX
Floating Rings Science Set with Platform
Advanced: magnetic spring scaleAvanzado: báscula magnética
InstructionsInstrucciones
OrderOrdenar
KITFRBX
Floating Rings Science Set with Platform
Advanced: magnetic spring scaleAvanzado: báscula magnética
InstructionsInstrucciones
OrderOrdenar
Introduction Introducción
This page is the general guide for the MiniScience floating rings kits. The four models above share the same basic project: six ring magnets float one above the other on a wooden dowel. Each model also has its own instruction page; click a kit to open it. If you don't have a kit, you can order one online.
Esta página es la guía general de los kits de anillos flotantes de MiniScience. Los cuatro modelos de arriba comparten el mismo proyecto básico: seis imanes de anillo flotan uno sobre otro en una varilla de madera. Cada modelo tiene además su propia página de instrucciones; haz clic en un kit para abrirla. Si no tienes un kit, puedes pedirlo en línea.
The fact that like magnetic poles repel each other is the basis for the design of many industrial devices, and repelling magnets are often part of a larger electrical or mechanical system. When you move the north pole of one magnet toward the north pole of another, the other magnet is pushed away at first, but soon it flips over and its south pole attracts your magnet.
El hecho de que los polos magnéticos iguales se repelan es la base del diseño de muchos equipos industriales, y los imanes que se repelen suelen formar parte de un sistema eléctrico o mecánico más grande. Cuando acercas el polo norte de un imán al polo norte de otro, al principio el otro imán es empujado, pero pronto se voltea y su polo sur atrae a tu imán.
That is why fixed magnets alone can never hold another magnet floating in place: it always slides away or flips over. A guide solves the problem. In these kits the guide is a wooden dowel; in high-speed maglev trains it is the track. The projects on this page are all applications of magnet levitation with like poles facing each other.
Por eso, solo con imanes fijos nunca se puede mantener a otro imán flotando en su lugar: siempre se desliza o se voltea. Una guía resuelve el problema. En estos kits la guía es una varilla de madera; en los trenes maglev de alta velocidad es la vía. Los proyectos de esta página son aplicaciones de la levitación magnética con polos iguales enfrentados.
With these projects students can explore:
Con estos proyectos los estudiantes pueden explorar:
- Magnetic poles: like poles repel and opposite poles attract.
- Magnetic levitation: how a magnetic force can balance gravity.
- How the pushing force between magnets changes with distance.
- Real-world uses of repelling magnets, such as maglev trains.
- With the advanced kit: a magnetic spring scale that weighs small objects.
- Los polos magnéticos: los polos iguales se repelen y los opuestos se atraen.
- La levitación magnética: cómo una fuerza magnética puede equilibrar la gravedad.
- Cómo cambia con la distancia la fuerza con que se empujan los imanes.
- Usos reales de los imanes que se repelen, como los trenes de levitación magnética (maglev).
- Con el kit avanzado: una báscula magnética de resorte que pesa objetos pequeños.
Which kit do I have? ¿Qué kit tengo?
| Kit | Magnets | Base | Extra parts | Level |
|---|---|---|---|---|
| KITFR | 6 painted ceramic ring magnets, assorted colors | Rectangular wooden base | — | Basic |
| KITFRB | 6 black ceramic ring magnets | Rectangular wooden base | — | Basic |
| KITFRSG | 6 painted ceramic ring magnets, assorted colors | Square wooden block | — | Basic (student grade) |
| KITFRBX | 6 black ceramic ring magnets | Rectangular wooden base | Clear test tube with cap and petri dish, to build a magnetic spring scale | Advanced, with a magnetic spring scale |
| Kit | Imanes | Base | Piezas adicionales | Nivel |
|---|---|---|---|---|
| KITFR | 6 imanes cerámicos de anillo pintados, de colores variados | Base de madera rectangular | — | Básico |
| KITFRB | 6 imanes cerámicos de anillo negros | Base de madera rectangular | — | Básico |
| KITFRSG | 6 imanes cerámicos de anillo pintados, de colores variados | Bloque de madera cuadrado | — | Básico (grado estudiantil) |
| KITFRBX | 6 imanes cerámicos de anillo negros | Base de madera rectangular | Tubo de ensayo transparente con tapa y caja Petri, para armar una báscula magnética de resorte | Avanzado, con una báscula magnética de resorte |
Items Needed Materiales Necesarios
Before starting, verify the content of your kit against the list below. All four kits include:
Antes de comenzar, verifica el contenido de tu kit con la siguiente lista. Los cuatro kits incluyen:
- Wooden base with a pre-drilled hole
- Wooden dowel
- 6 ceramic ring magnets
- White glue or wood glue, only if the dowel is loose (not included)
- Ruler with millimeter marks, for the experiment (not included)
- Base de madera con un orificio
- Varilla de madera
- 6 imanes cerámicos de anillo
- Pegamento blanco o cola para madera, solo si la varilla queda floja (no incluido)
- Regla con marcas en milímetros, para el experimento (no incluido)
The parts for the magnetic spring scale are listed in the advanced package at the end of this page.
Las piezas para la báscula magnética de resorte se indican en el paquete avanzado, al final de esta página.
Kit content may be different from the images shown on this page.
El contenido del kit puede ser diferente de las imágenes que se muestran en esta página.
A Science Fair Project Un Proyecto para la Feria de Ciencias
Any of the floating rings kits may be used for a science project, technology project, display project, or an engineering project for your science fair. Your completed project will also be an educational tool for yourself and your classmates who need to understand magnetic poles, magnetic forces and magnetic levitation.
Cualquiera de los kits de anillos flotantes puede usarse para un proyecto científico, tecnológico, de exhibición o de ingeniería para tu feria de ciencias. Tu proyecto terminado también será una herramienta educativa para ti y tus compañeros que necesiten comprender los polos magnéticos, las fuerzas magnéticas y la levitación magnética.
Safety Information Información de Seguridad
- Ceramic magnets are brittle. Do not let them snap together: they can chip or crack, and the chips can be sharp.
- Keep the magnets away from phones, computers, credit cards and other electronic devices.
- Keep the magnets away from anyone with a pacemaker or another medical implant.
- Never put magnets in your mouth.
- Los imanes cerámicos son frágiles. No dejes que se peguen de golpe: pueden astillarse o romperse, y las astillas pueden cortar.
- Mantén los imanes lejos de teléfonos, computadoras, tarjetas de crédito y otros aparatos electrónicos.
- Mantén los imanes lejos de cualquier persona con marcapasos u otro implante médico.
- Nunca te metas un imán en la boca.
Adult supervision is required for young children.
Se requiere la supervisión de un adulto para niños pequeños.
Assembly Procedure Procedimiento de Armado
Step 1 — Mount the dowel.Paso 1 — Coloca la varilla. Push one end of the wooden dowel into the hole in the base until it stands straight up. If the dowel is loose, put a few drops of white glue or wood glue in the hole, insert the dowel, and wait a few hours until the glue is fully dry. Introduce un extremo de la varilla de madera en el orificio de la base hasta que quede bien derecha. Si la varilla queda floja, pon unas gotas de pegamento blanco o cola para madera en el orificio, inserta la varilla y espera unas horas hasta que el pegamento esté completamente seco.
Step 2 — Place the first magnet.Paso 2 — Coloca el primer imán. Slide one ring magnet over the dowel and let it go down until it rests on the base. Pasa un imán de anillo por la varilla y déjalo bajar hasta que descanse sobre la base.
Step 3 — Find the repelling side.Paso 3 — Encuentra el lado que repele. Take a second magnet and hold it firmly just above the first one. If you feel the magnets pulling toward each other, turn the magnet over. When you feel them pushing each other away, like poles are facing each other. Toma un segundo imán y sostenlo con firmeza justo encima del primero. Si sientes que los imanes se atraen, dale la vuelta al imán. Cuando sientas que se empujan, los polos iguales están enfrentados.
Step 4 — Make the second magnet float.Paso 4 — Haz flotar el segundo imán. Keeping the magnet turned the same way, slide it over the dowel and gently let it go. Instead of dropping onto the first magnet, it floats above it. Sin cambiar la posición del imán, pásalo por la varilla y suéltalo con suavidad. En lugar de caer sobre el primer imán, flota encima de él.
Step 5 — Add the other magnets.Paso 5 — Agrega los demás imanes. Repeat steps 3 and 4 with the remaining four magnets, one at a time. Always test before letting go: if a magnet is pulled down, lift it off, turn it over and try again. Finally you will have six ring magnets on a column. They can move up and down freely, but gravity cannot pull them together, because like poles are facing each other. Repite los pasos 3 y 4 con los cuatro imanes restantes, uno por uno. Prueba siempre antes de soltar: si un imán es atraído hacia abajo, sácalo, dale la vuelta y vuelve a intentarlo. Al final tendrás seis imanes de anillo en una columna. Pueden subir y bajar libremente, pero la gravedad no logra juntarlos, porque los polos iguales están enfrentados.
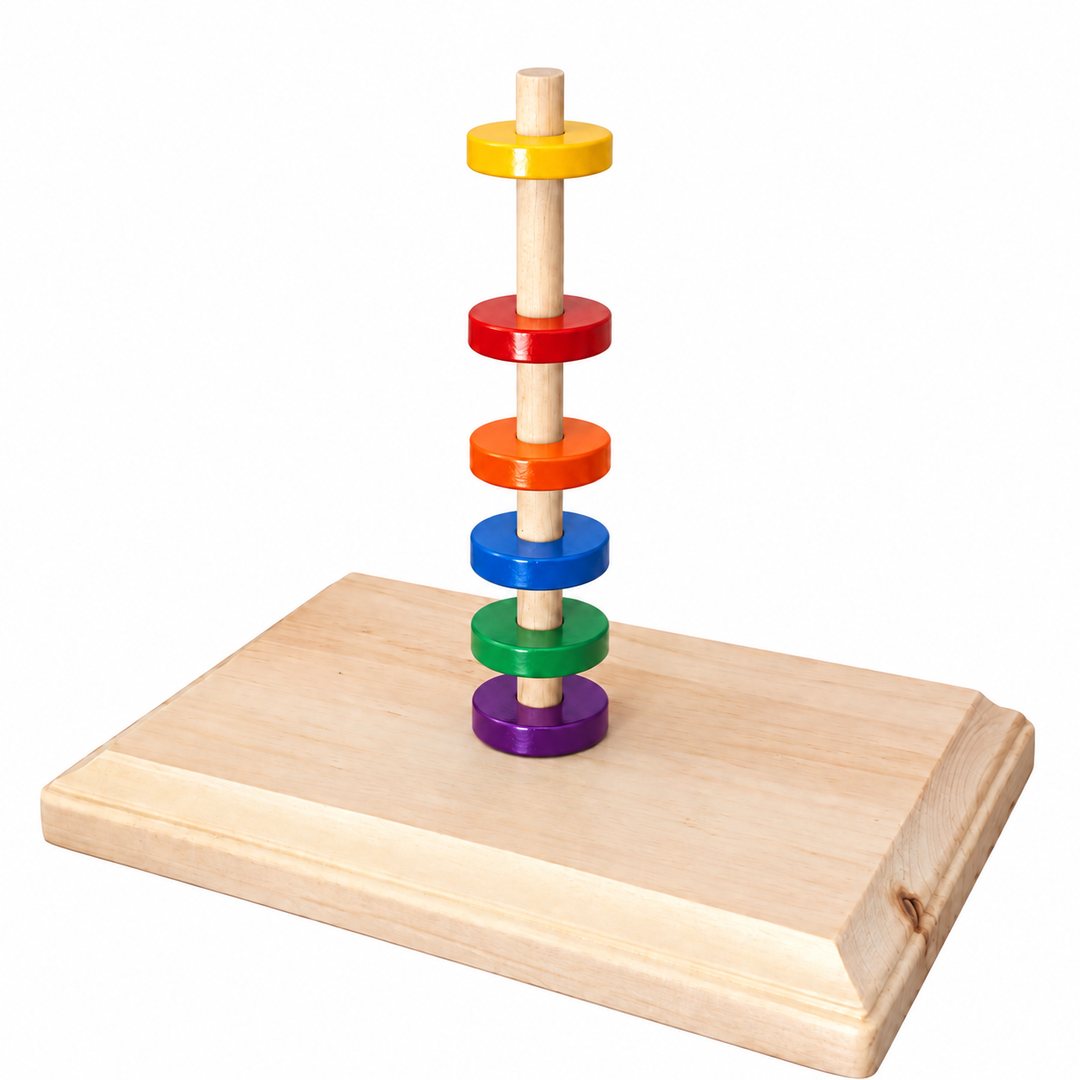
Step 6 — Test your floating rings.Paso 6 — Prueba tus anillos flotantes. Push the top magnet down gently. How much force do you need to push all the magnets together? Now release it. What happens? Why? Can you think of other products that could use this magnet levitation model? Empuja con suavidad el imán de arriba hacia abajo. ¿Cuánta fuerza necesitas para juntar todos los imanes? Ahora suéltalo. ¿Qué pasa? ¿Por qué? ¿Se te ocurren otros productos que podrían usar este modelo de levitación magnética?
If you push the rings down and let go quickly, the top ring can jump off the dowel. Keep your face away from the top of the dowel.
Si empujas los anillos hacia abajo y los sueltas de golpe, el anillo de arriba puede salir disparado de la varilla. Mantén la cara lejos de la punta de la varilla.
What Is Happening? ¿Qué Está Pasando?
Every ring magnet has a north pole on one flat face and a south pole on the other flat face. When two magnets are placed with the same poles facing each other (north to north, or south to south), they push each other away. This pushing force is called magnetic repulsion.
Cada imán de anillo tiene el polo norte en una cara plana y el polo sur en la otra. Cuando dos imanes se colocan con los polos iguales enfrentados (norte con norte, o sur con sur), se empujan entre sí. Esta fuerza de empuje se llama repulsión magnética.
Each floating ring is pulled down by gravity (its weight) and pushed up by the magnet below it. The ring stops where these two forces are balanced. The lower magnets have to hold up the weight of all the rings above them, so the rings near the bottom sit closer together than the rings near the top.
Cada anillo que flota es atraído hacia abajo por la gravedad (su peso) y empujado hacia arriba por el imán que tiene debajo. El anillo se queda donde esas dos fuerzas se equilibran. Los imanes de abajo tienen que sostener el peso de todos los anillos que tienen encima, por eso los anillos de abajo quedan más juntos que los de arriba.
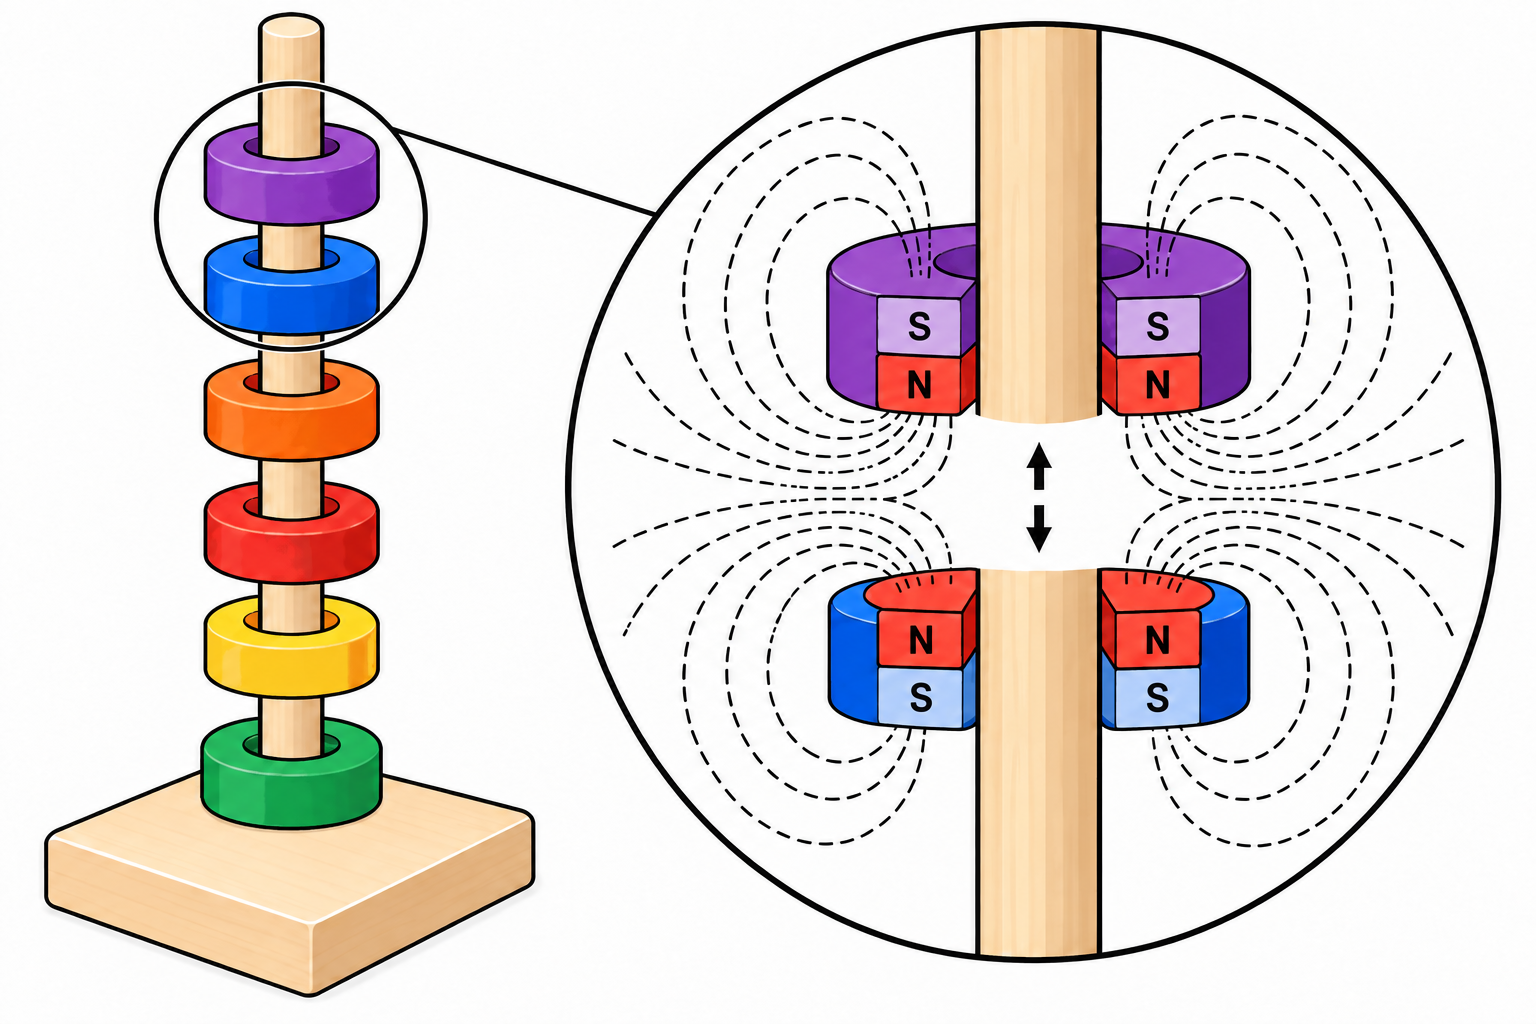
The magnetic force gets much stronger as the magnets get closer. That is why the rings act like a spring: push the top ring down and the rings squeeze together; let go and they bounce back up.
La fuerza magnética se vuelve mucho más fuerte a medida que los imanes se acercan. Por eso los anillos se comportan como un resorte: empuja el anillo de arriba y los anillos se juntan; suéltalo y vuelven a subir.
The dowel is important. Without it, a floating magnet would slide sideways or flip over and snap onto its neighbor. The dowel only lets the rings move up and down.
La varilla es importante. Sin ella, un imán flotante se deslizaría hacia un lado o se voltearía y se pegaría al imán vecino. La varilla solo deja que los anillos se muevan hacia arriba y hacia abajo.
In the real world: maglev (magnetic levitation) trains use magnetic forces to float above the track. With no wheels touching the rails there is almost no friction, so they can travel at very high speeds. Repelling magnets are also used in some bearings, shock absorbers and toys.
En el mundo real: los trenes maglev (de levitación magnética) usan fuerzas magnéticas para flotar sobre la vía. Como no hay ruedas tocando los rieles, casi no hay fricción y pueden viajar a velocidades muy altas. Los imanes que se repelen también se usan en algunos rodamientos, amortiguadores y juguetes.
Troubleshooting Solución de Problemas
- A magnet sticks to the one below instead of floating. It is upside down. Lift it off the dowel, turn it over and slide it down again.
- The rings get stuck on the dowel. Make sure the dowel stands straight up. Tap the dowel gently to help the rings settle.
- The dowel wobbles or leans. Glue it into the hole of the base and let the glue dry completely.
- Two magnets snapped together and are hard to separate. Take them off the dowel together, then slide one magnet sideways off the other instead of pulling them straight apart.
- Un imán se pega al de abajo en lugar de flotar. Está al revés. Sácalo de la varilla, dale la vuelta y vuelve a bajarlo.
- Los anillos se atascan en la varilla. Asegúrate de que la varilla esté bien derecha. Dale unos golpecitos suaves a la varilla para que los anillos se acomoden.
- La varilla se mueve o se inclina. Pégala en el orificio de la base y deja que el pegamento se seque por completo.
- Dos imanes se pegaron y cuesta separarlos. Sácalos juntos de la varilla y luego desliza un imán hacia un lado sobre el otro, en lugar de jalarlos en línea recta.
Science Project Proyecto Científico
Research question:Pregunta de investigación: Are all the gaps between the floating rings the same size, or do they change from the top of the tower to the bottom? ¿Todos los espacios entre los anillos flotantes tienen el mismo tamaño, o cambian desde arriba hasta abajo de la torre?
Sample hypothesis 1:Hipótesis de ejemplo 1: I hypothesize that all the gaps between the rings are the same size, because all the magnets are the same. Mi hipótesis es que todos los espacios entre los anillos tienen el mismo tamaño, porque todos los imanes son iguales.
Sample hypothesis 2:Hipótesis de ejemplo 2: I hypothesize that the gaps get smaller toward the bottom of the tower, because the lower magnets have to hold up the weight of more rings. Mi hipótesis es que los espacios se hacen más pequeños hacia abajo de la torre, porque los imanes de abajo tienen que sostener el peso de más anillos.
Experiment (Observation and Reporting) Experimento (Observación y Reporte)
- Assemble the tower with all six magnets. Tap the dowel gently so the rings settle.
- Number the gaps from the top: gap 1 is between the top ring and the second ring, and gap 5 is between the two bottom rings.
- With a ruler held next to the dowel, measure each gap in millimeters, from the bottom face of the upper ring to the top face of the lower ring. Read the ruler at eye level.
- Take all the magnets off, assemble the tower again and repeat the measurements. Do three trials in total.
- Calculate the average of the three trials for each gap.
- Arma la torre con los seis imanes. Dale unos golpecitos suaves a la varilla para que los anillos se acomoden.
- Numera los espacios desde arriba: el espacio 1 está entre el anillo de arriba y el segundo anillo, y el espacio 5 está entre los dos anillos de abajo.
- Con una regla junto a la varilla, mide cada espacio en milímetros, desde la cara inferior del anillo de arriba hasta la cara superior del anillo de abajo. Lee la regla a la altura de los ojos.
- Saca todos los imanes, vuelve a armar la torre y repite las mediciones. Haz tres pruebas en total.
- Calcula el promedio de las tres pruebas para cada espacio.
Record your readings in the table below:
Anota tus mediciones en la siguiente tabla:
| Gap | Trial 1 (mm) | Trial 2 (mm) | Trial 3 (mm) | Average (mm) |
|---|---|---|---|---|
| 1 (top) | ||||
| 2 | ||||
| 3 | ||||
| 4 | ||||
| 5 (bottom) |
| Espacio | Prueba 1 (mm) | Prueba 2 (mm) | Prueba 3 (mm) | Promedio (mm) |
|---|---|---|---|---|
| 1 (arriba) | ||||
| 2 | ||||
| 3 | ||||
| 4 | ||||
| 5 (abajo) |
Sample data tableTabla de datos de ejemplo (Values are not real)(Los valores no son reales):
| Gap | Trial 1 (mm) | Trial 2 (mm) | Trial 3 (mm) | Average (mm) |
|---|---|---|---|---|
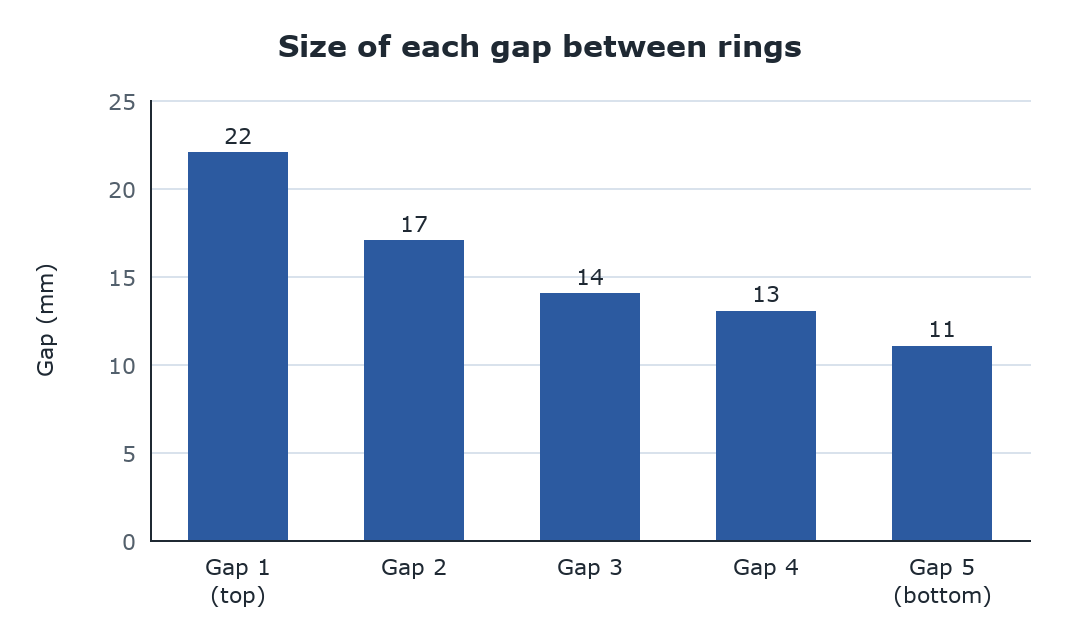
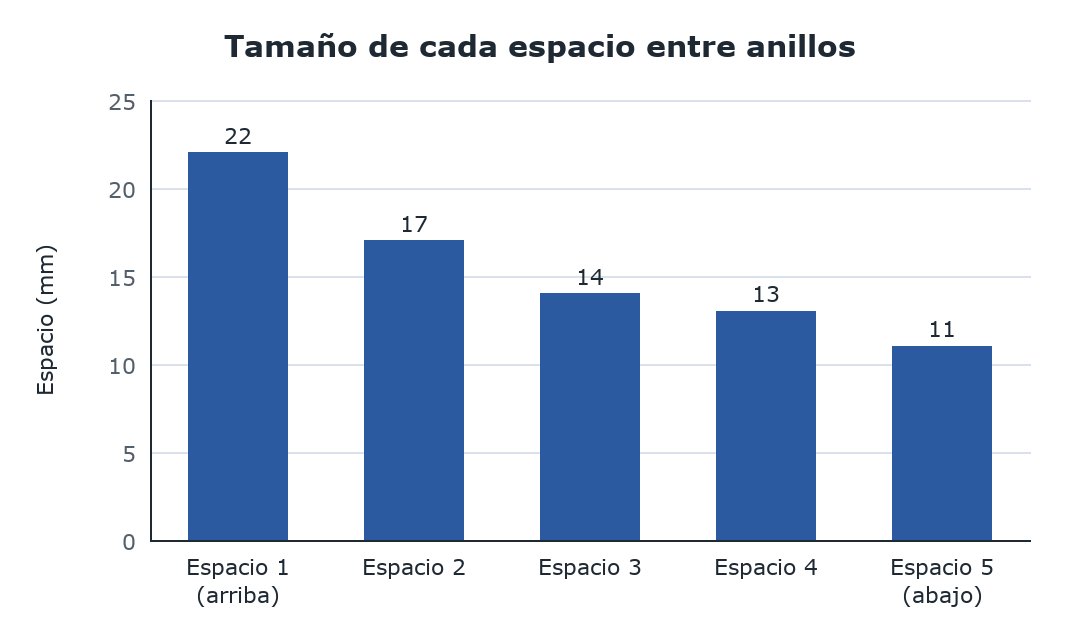
| 1 (top) | 22 | 21 | 23 | 22 |
| 2 | 17 | 18 | 16 | 17 |
| 3 | 14 | 14 | 14 | 14 |
| 4 | 13 | 12 | 14 | 13 |
| 5 (bottom) | 11 | 11 | 11 | 11 |
| Espacio | Prueba 1 (mm) | Prueba 2 (mm) | Prueba 3 (mm) | Promedio (mm) |
|---|---|---|---|---|
| 1 (arriba) | 22 | 21 | 23 | 22 |
| 2 | 17 | 18 | 16 | 17 |
| 3 | 14 | 14 | 14 | 14 |
| 4 | 13 | 12 | 14 | 13 |
| 5 (abajo) | 11 | 11 | 11 | 11 |
Analysis and Reporting Análisis y Reporte
Review the averages in your data table. Did the gaps stay the same from top to bottom, or did they change? Compare your results with your hypothesis and explain them using what you learned about magnetic repulsion and weight. Discuss the other factors that could have affected your results, such as friction between the rings and the dowel, magnets of slightly different strength, a dowel that is not perfectly straight, and how hard it is to read a ruler to the nearest millimeter.
Revisa los promedios de tu tabla de datos. ¿Los espacios se mantuvieron iguales de arriba hacia abajo, o cambiaron? Compara tus resultados con tu hipótesis y explícalos con lo que aprendiste sobre la repulsión magnética y el peso. Comenta otros factores que pudieron influir en tus resultados, como la fricción entre los anillos y la varilla, imanes con fuerzas ligeramente distintas, una varilla que no está perfectamente derecha y lo difícil que es leer una regla con precisión de un milímetro.
Make a Graph Haz una Gráfica
Use your data/results table to draw a graph, or create one like this in Excel. Make one bar for each gap, using the average values, so you can visually compare the gaps from the top of the tower to the bottom.
Usa tu tabla de datos y resultados para dibujar una gráfica, o crea una como esta en Excel. Haz una barra para cada espacio, con los valores promedio, y así podrás comparar visualmente los espacios desde arriba hasta abajo de la torre.
Ready to build your floating rings? Choose your kit and check price and availability at the secure online store.
¿Listo para armar tus anillos flotantes? Elige tu kit y consulta precio y disponibilidad en la tienda en línea segura.
KITFR
Floating Rings Science Set
Order NowOrdenar Ahora
KITFRB
Floating Rings Science Set (Black Magnets)
Order NowOrdenar Ahora
KITFRSG
Floating Rings Science Set (Student Grade)
Order NowOrdenar Ahora
The rest of this page is the optional advanced package: how to build the magnetic spring scale.
El resto de esta página es el paquete avanzado, que es opcional: cómo armar la báscula magnética de resorte.
Advanced Package: KITFRBX — Magnetic Spring Scale Paquete Avanzado: KITFRBX — Báscula Magnética de Resorte
The Floating Rings Science Set with Platform (KITFRBX) adds a clear plastic test tube with cap and a clear plastic petri dish to the floating rings, to build a scale that weighs small objects. You will also need a craft stick, a strip of colored paper, clear tape, a hot glue gun, white glue and 30 identical coins (not included). With the other kits you can build the same scale with a clear plastic or paper tube that fits over the dowel and a light plastic or paper tray.
El Floating Rings Science Set with Platform (KITFRBX) agrega a los anillos flotantes un tubo de ensayo de plástico transparente con tapa y una caja Petri de plástico transparente, para armar una báscula que pesa objetos pequeños. También necesitarás un palito de manualidades, una tira de papel de color, cinta transparente, una pistola de silicón caliente, pegamento blanco y 30 monedas iguales (no incluido). Con los otros kits puedes armar la misma báscula con un tubo de plástico transparente o de papel que entre en la varilla y una bandeja liviana de plástico o de papel.
Build the magnetic spring scale Arma la báscula magnética de resorte
The floating rings behave like a spring: the more weight you put on the top ring, the more the rings squeeze together. A magnetic spring scale uses this to measure weight. First you build a platform: a tray (the petri dish) glued on top of the test tube.
Los anillos flotantes se comportan como un resorte: cuanto más peso pones sobre el anillo de arriba, más se juntan los anillos. Una báscula magnética de resorte aprovecha esto para medir el peso. Primero construyes una plataforma: una bandeja (la caja Petri) pegada encima del tubo de ensayo.
Read steps 7 to 9 before you start: hot glue cools in a few seconds. Adult supervision is required when using the glue gun.
Lee los pasos 7 a 9 antes de empezar: el silicón caliente se enfría en pocos segundos. Se requiere la supervisión de un adulto al usar la pistola de silicón.
Step 7 — Glue the green cap to the round end of the tube.Paso 7 — Pega la tapa verde en la punta redonda del tubo. The closed end of the test tube is round, so it cannot hold the tray. Turn the green cap upside down and put the round end of the tube inside it. Apply hot glue all around the joint where the tube meets the cap, and hold the tube straight until the glue cools. The top of the cap now gives the tube a flat end. La punta cerrada del tubo de ensayo es redonda, así que no puede sostener la bandeja. Pon la tapa verde boca arriba y mete dentro la punta redonda del tubo. Aplica silicón caliente alrededor de la unión entre el tubo y la tapa, y sostén el tubo derecho hasta que el silicón se enfríe. La parte de arriba de la tapa le da ahora al tubo una punta plana.
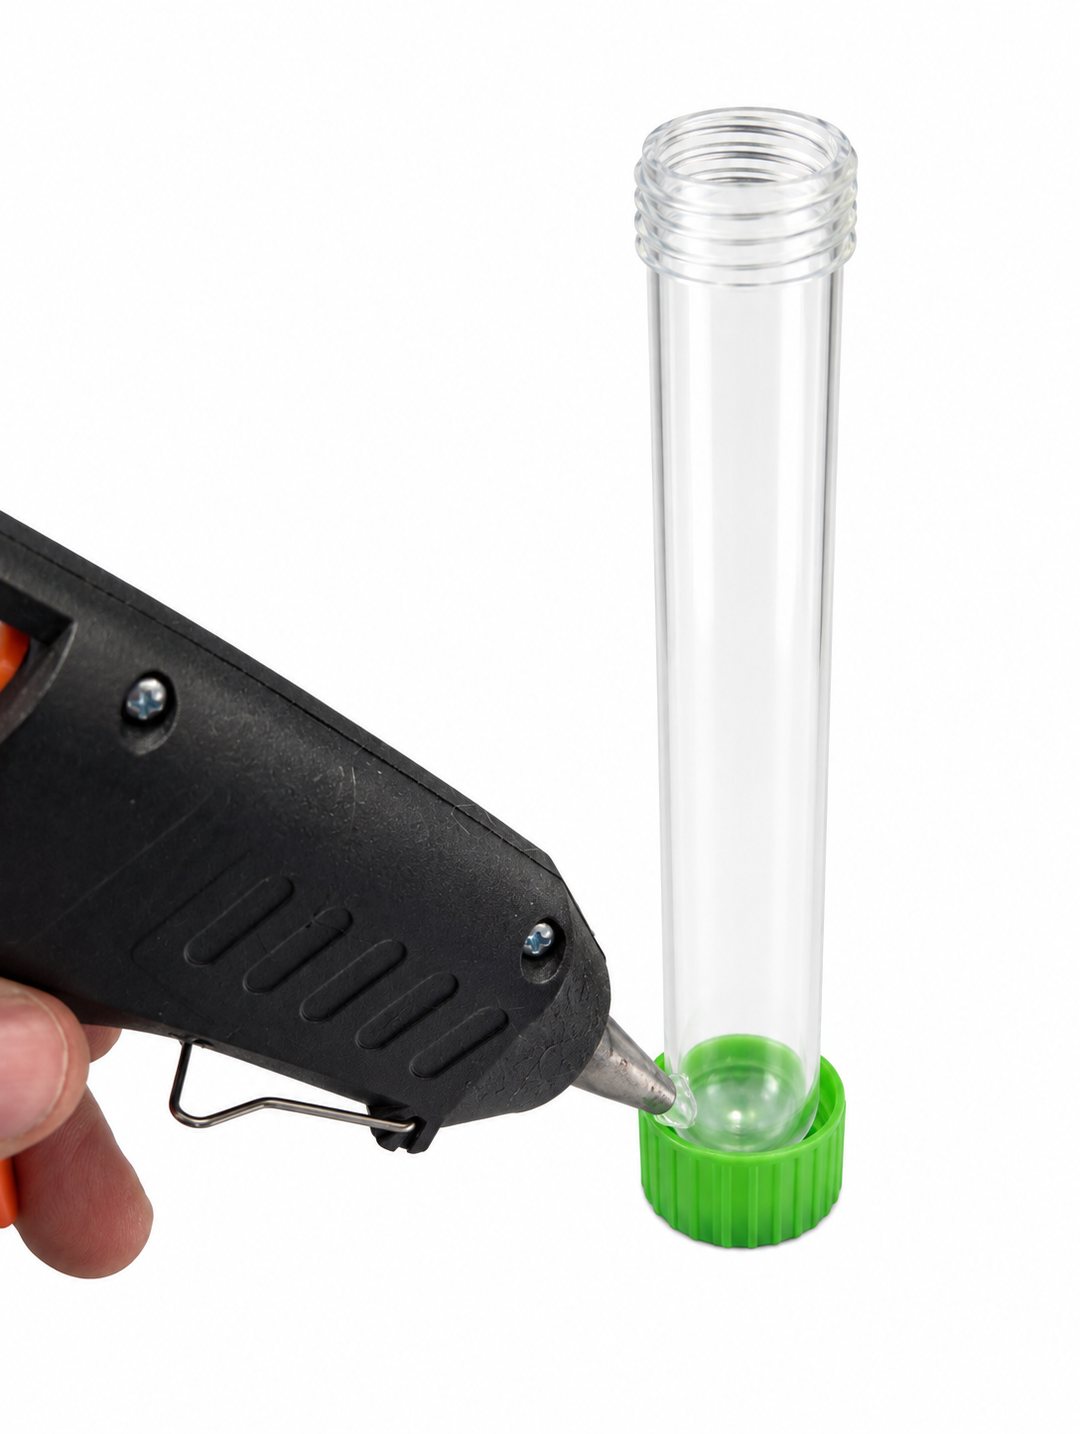
Step 8 — Put hot glue on the green cap.Paso 8 — Pon silicón caliente en la tapa verde. Mark the center of the petri dish first (see step 9), so it is ready. Then turn the tube over so the green cap is on top, and put a generous drop of hot glue in the middle of the flat surface of the cap. Primero marca el centro de la caja Petri (ver el paso 9), para tenerla lista. Luego voltea el tubo para que la tapa verde quede arriba y pon una buena gota de silicón caliente en el centro de la superficie plana de la tapa.
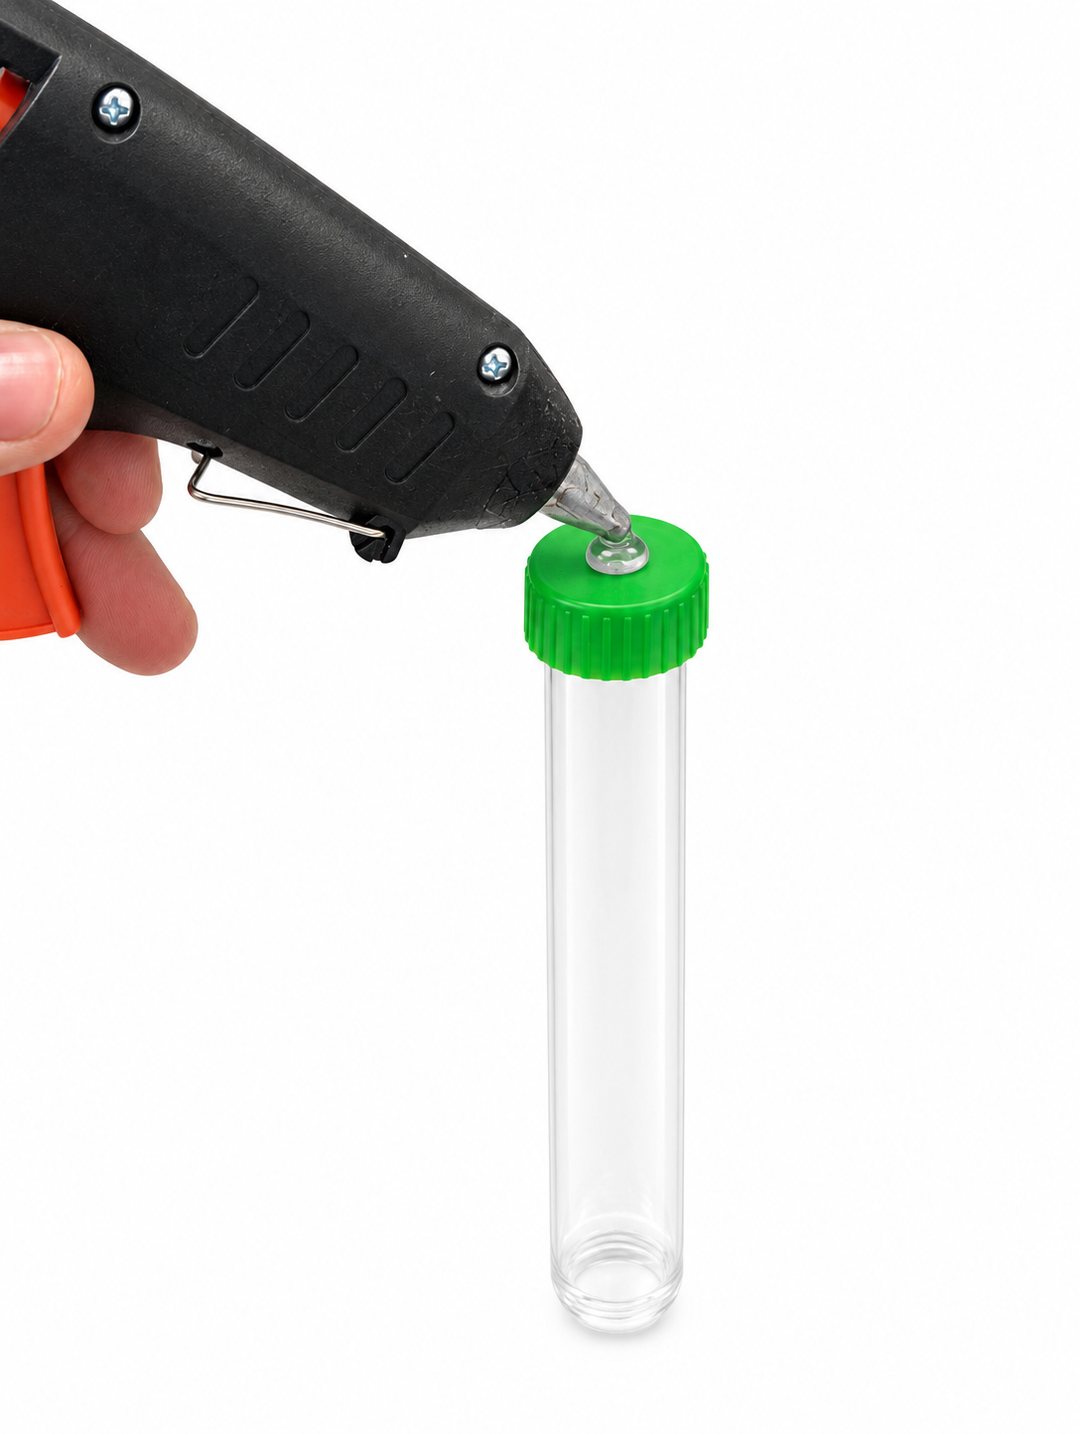
Step 9 — Find the center of the petri dish and glue the cap to it.Paso 9 — Encuentra el centro de la caja Petri y pega la tapa. To find the center, measure the diameter of the petri dish with a ruler, across its widest part, and make a small mark on the bottom at half that distance. Turn the dish a quarter turn and repeat: the center is where the two marks cross. Press the glued cap onto the center mark on the bottom of the dish, and hold the tube straight, at a right angle to the dish, until the glue cools. Your platform is ready. Para encontrar el centro, mide con una regla el diámetro de la caja Petri por su parte más ancha y haz una pequeña marca en el fondo a la mitad de esa distancia. Gira la caja un cuarto de vuelta y repite: el centro es donde se cruzan las dos marcas. Presiona la tapa con el silicón sobre la marca del centro, en el fondo de la caja, y sostén el tubo derecho, en ángulo recto con la caja, hasta que el silicón se enfríe. Tu plataforma está lista.
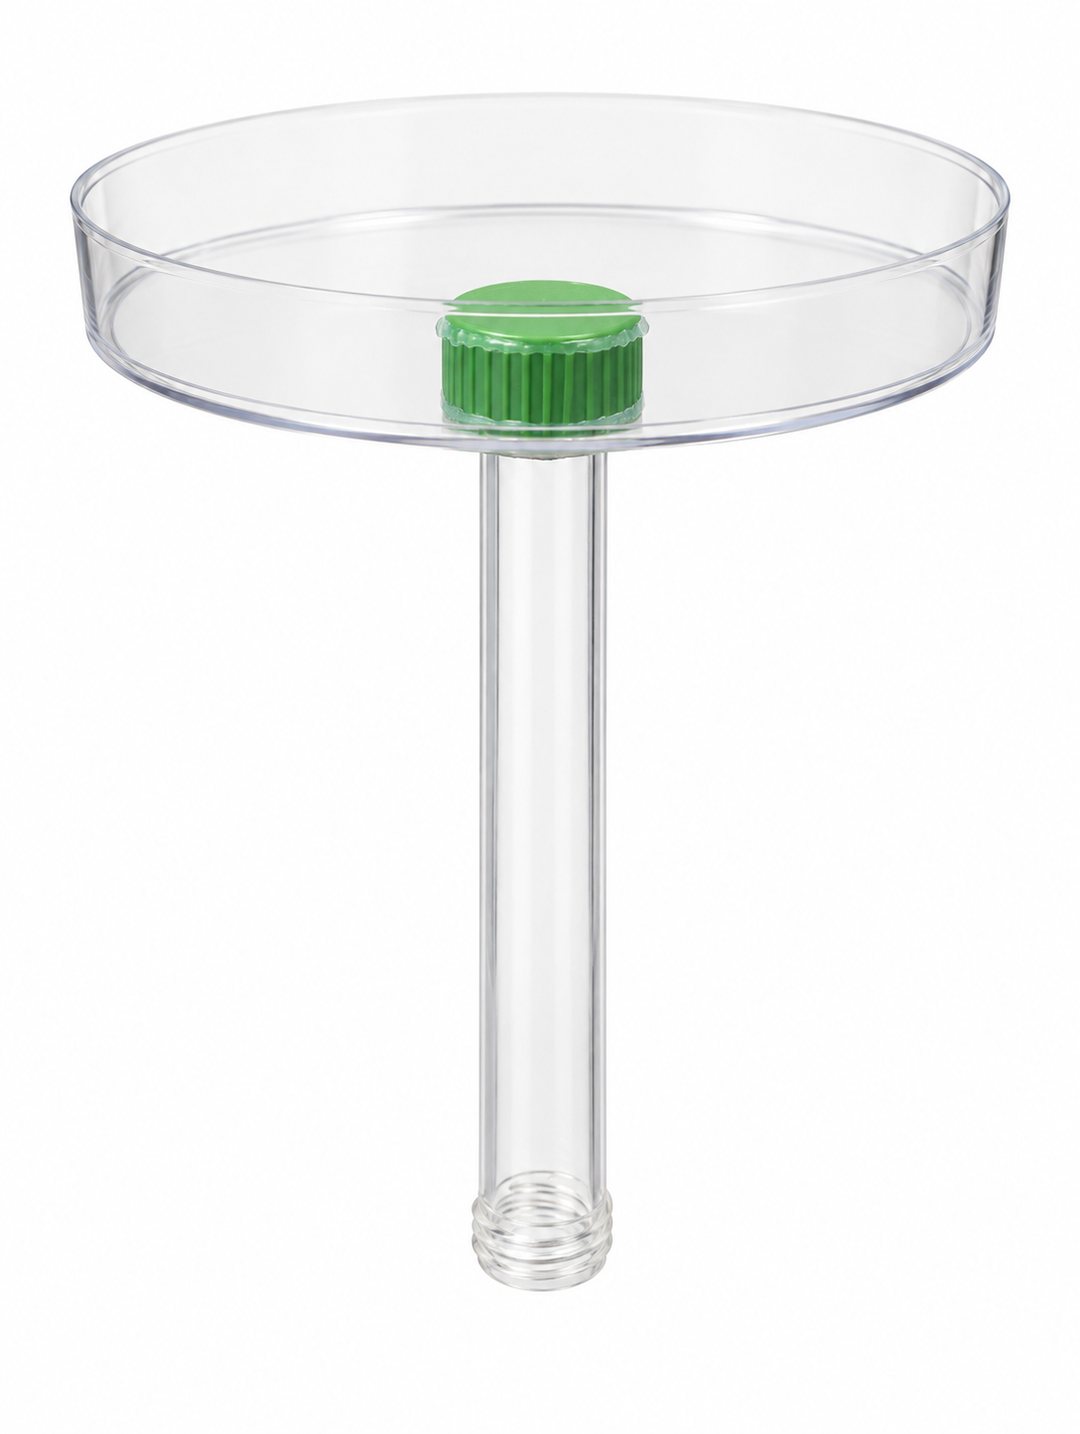
Step 10 — Place the platform on the rings.Paso 10 — Coloca la plataforma sobre los anillos. Slide the open end of the tube over the dowel until the tube rests on the top magnet. The dowel guides the tube, so the platform can only move up and down. Check that the top of the dowel never touches the inside end of the tube, even when you press the platform down. Pasa el extremo abierto del tubo por la varilla hasta que el tubo descanse sobre el imán de arriba. La varilla guía el tubo, así que la plataforma solo puede moverse hacia arriba y hacia abajo. Verifica que la punta de la varilla nunca toque el fondo interior del tubo, incluso cuando presionas la plataforma hacia abajo.
Step 11 — Make the pointer.Paso 11 — Haz la aguja indicadora. Cut a strip of colored paper about 1 cm (3/8") wide. Wrap one end around the tube and tape it in place, then cut the free end into an arrow that points to the side. Corta una tira de papel de color de unos 1 cm (3/8") de ancho. Enrolla un extremo alrededor del tubo y pégalo con cinta, luego recorta el extremo libre en forma de flecha que apunte hacia un lado.
Step 12 — Mount the scale stick.Paso 12 — Coloca el palito de la escala. Glue a craft stick upright on the base, next to the tube, so that the tip of the arrow almost touches it. Let the glue dry before continuing. Pega un palito de manualidades en posición vertical sobre la base, junto al tubo, de modo que la punta de la flecha casi lo toque. Deja secar el pegamento antes de continuar.
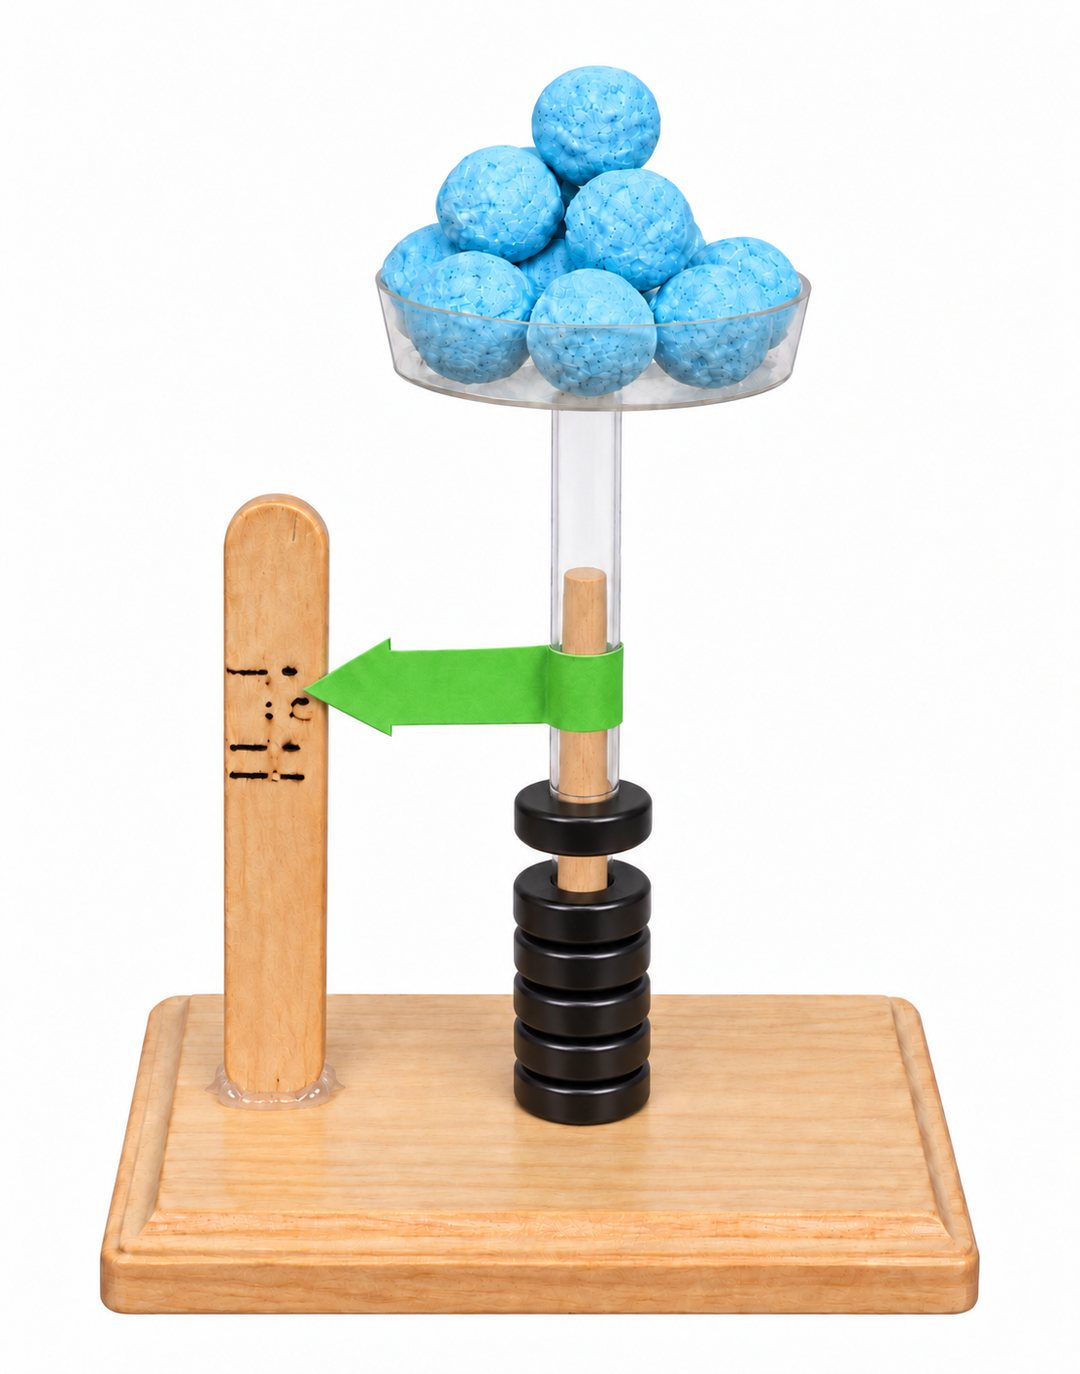
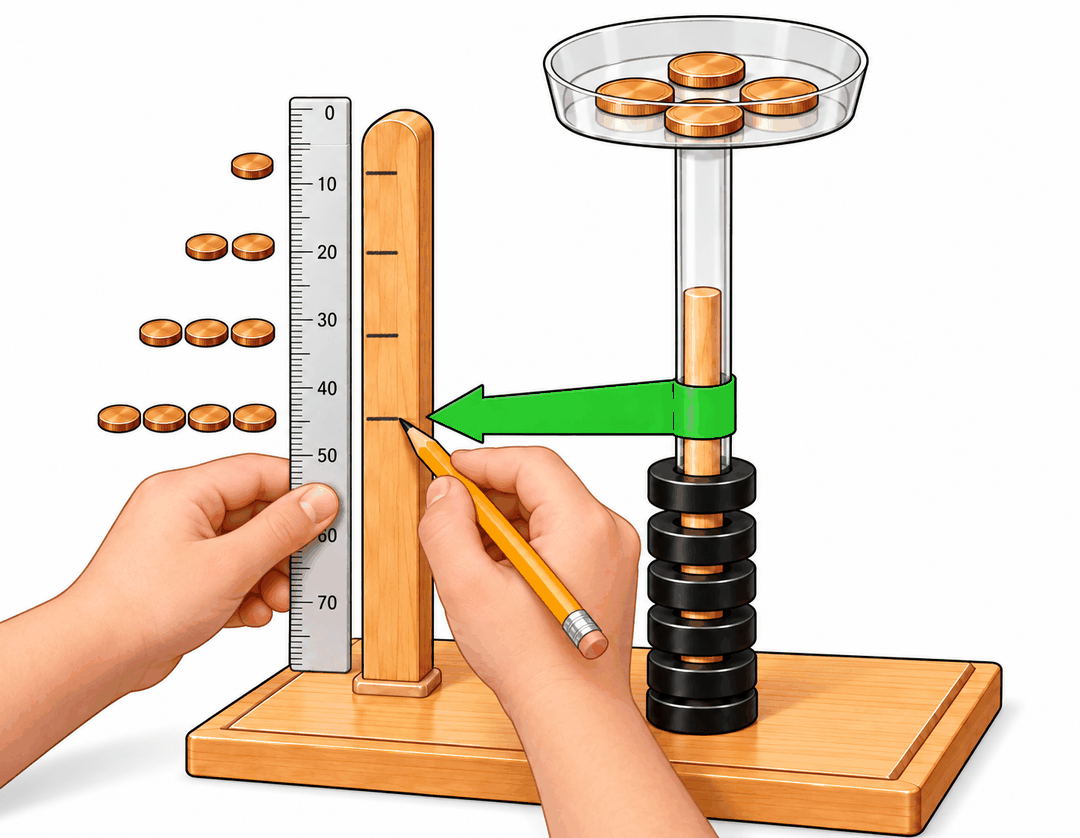
Step 13 — Calibrate the scale.Paso 13 — Calibra la báscula. With the tray empty, tap the dowel gently and mark the stick at the tip of the arrow: this is zero. Put 5 identical coins on the tray, wait for the tray to stop moving and mark the new position. Keep adding 5 coins at a time and mark each position. A US penny made after 1982 has a mass of 2.5 g, so every 5 pennies add 12.5 g. With other coins, weigh 10 of them on a kitchen scale and divide by 10. Now place a small, light object on the empty tray and read its mass from your marks. Con la bandeja vacía, dale unos golpecitos suaves a la varilla y marca el palito en la punta de la flecha: este es el cero. Pon 5 monedas iguales en la bandeja, espera a que la bandeja deje de moverse y marca la nueva posición. Sigue agregando monedas de 5 en 5 y marca cada posición. Un centavo de dólar estadounidense fabricado después de 1982 tiene una masa de 2.5 g, así que cada 5 centavos suman 12.5 g. Con otras monedas, pesa 10 en una báscula de cocina y divide entre 10. Ahora coloca un objeto pequeño y liviano en la bandeja vacía y lee su masa en tus marcas.
The marks will not be evenly spaced. This is not a mistake: the closer the magnets get, the harder they push back, so each new group of coins moves the tray a little less.
Las marcas no quedarán a la misma distancia unas de otras. No es un error: cuanto más se acercan los imanes, con más fuerza empujan, así que cada nuevo grupo de monedas hace bajar la bandeja un poco menos.
The KITFRBX instruction page includes a science project that tests whether the magnetic spring scale is linear.
La página de instrucciones del KITFRBX incluye un proyecto científico que comprueba si la báscula magnética de resorte es lineal.
If you do not have one of these kits or need extra parts to complete your project, you can order it now. Kit content may be different from the images shown on this page. Check price and availability at the secure online store.
Si no tienes uno de estos kits o necesitas piezas adicionales para completar tu proyecto, puedes pedirlo ahora. El contenido del kit puede ser diferente de las imágenes de esta página. Consulta precio y disponibilidad en la tienda en línea segura.
KITFR
Floating Rings Science Set
Order NowOrdenar Ahora
KITFRB
Floating Rings Science Set (Black Magnets)
Order NowOrdenar Ahora
KITFRSG
Floating Rings Science Set (Student Grade)
Order NowOrdenar Ahora
KITFRBX
Floating Rings Science Set with Platform
Order NowOrdenar Ahora
Secure Online StoreTienda en Línea Segura
Order Now / Ordenar Ahora
Floating Rings Science Set — Part# KITFR
https://shop.miniscience.com/KITFR
Floating Rings Science Set (Black Magnets) — Part# KITFRB
https://shop.miniscience.com/KITFRB
Floating Rings Science Set (Student Grade) — Part# KITFRSG
https://shop.miniscience.com/KITFRSG
Floating Rings Science Set with Platform — Part# KITFRBX
https://shop.miniscience.com/KITFRBX
MiniScience.com
1059 Main Avenue
Clifton, New Jersey 07011
Tel: (973) 777-3113
Email: info@MiniScience.com