| Introduction:
Pulley motor car is an
electric car using pulleys to transfer the mechanical energy
from the motor to the wheels. MiniScience's Pulley Car activity introduces students to
compound machines and simple machines including pulley,
wheel and axle while incorporating problem solving,
mechanical design and modeling. In addition,
students will experience using hand tools as they construct their Pulley Motor
Car. |
 |
Students can explore:
- Propulsion types and drive concepts
- Basic soldering techniques and electronic concepts
- Simple electric circuit including battery,
motor and switch
| Teacher Preparation: During construction of the
Pulley Motor racer vehicle, students
can experiment and
comprehend methods of power transfer, soldering (optional), wheel alignment and calculating
pulley wheel ratios. It is up to the teacher to make sure this background information is
provided to students in some manner.
Materials Checklist:
Before using the kit please make sure you have all the items listed below.
This kit has the supplies to build one pulley motor car model. A pulley motor
car is an electric car that uses pulleys and belts for its transmission system.
- Battery Holder
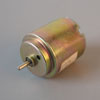
- AC motor
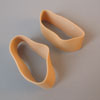
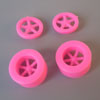
- Rear Slicks 1 9/16" diameter x 5/8" wide
- Front Wheels 1 3/8" diameter
- 1/8" dowel for axles
|
|
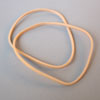
- Traction Bands
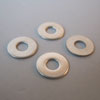
- Eyelets or washers
- Straw
- Eye Screws
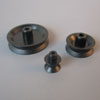
- Pulleys
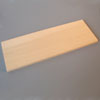
- Wood Sheet 5" x 2" x 3/32" (or
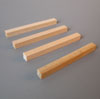
larger, so you can cut to any size)
- Axle Guards, Basswood 1/5" x 1/5" x 2" (5mm x 5mm x
5cm) sticks
- Motor Mount (With straps if needed)
- Procedure Sheet
| Propulsion Systems: Propulsion systems include using
two AA batteries and a DC motor with a Pulley and Rubber band drive.
Advanced students are encouraged to experiment with different size pulleys.
|
 |
Basic Tools Required
These items may be required to build the pulley
motor vehicle:
(You can make your car model without them as well)
- craft knife, used to cut or
trim soft wood.
- White glue, wood glue or glue gun
- Soldering Iron, needed if you
need to solder wires.
- Pliers, used to connect and
twist wires together if needed
- rulers, used for measurements
- Pencil, used for marking
Safety Recommendations
During the construction of the vehicle, the following safety
precautions should be observed.
- Wear safety glasses
- Use care with sharp cutting blades
- Avoid touching the tip of the glue gun or soldering gun
- Put safety first
Competition Categories
Competition between students can be based on design, drawings, final
appearance, distance-traveled, speed, etc.
Races can be held between cars in a track. Due
to the very high speed, design flaws can seriously damage the vehicle in its
first strike to a wall or any hard object.
In addition, teachers could implement a problem-solving category for advanced
or older students. Teachers would provide students with the pulley car kit then
instruct students to make use of additional materials in the classroom to
construct a customized vehicle. additional items could include wood
scraps, stickers, paint, CD, colored wheels and more. How elaborate or complex
the pulley motor cars are depends on imagination and resources.
Standard Assembly Steps
Make your pulley motor car model in 3
simple steps.
|
Step 1: |
Construct the basic car chassis with 4 wheels
| Cut a strip of
wood that is 2" (5cm) wide.
Mark the location
of axles by drawing two lines, one on each end of
the car, parallel to the front or back side. Axle
lines must be about 1 inch away from the front or
back.
On the axle lines,
mark two points that are 1/4" (6mm) away from each
side. Insert one eye screw in each of the points.
|
 |
| Eye screws are
used to hold the axles. Insert the axle and make
sure it is level and it can spin freely. If
necessary, adjust the eye screws.
For the back wheels
cut a space for the pulley before inserting the eye
screws. Without cutting a space for the pulley, one
wheel will stay out about 3/8" more than the other. |
 |
| Cut some plastic
tubes or straws and use them as the spacer in both
sides. If you have metal washers, insert them
between the straw pieces and the eye screws. |
 |
| Insert the wheels.
Wheels may be inserted while the axle is in
position.
You can also
insert the axle into one wheel and then pass it
through the eye screws. |
 |
| At the end your
simple car will look like this. You can use it the
way it is or you can turn it over as shown in the
picture bellow. |
 |
| In the model shown
here, the gears are built in the rear slicks (rear
wheels). With plain wheels, you had to insert a
pulley or gear in the same axle with one wheel.
If you don't need to
install pulleys or gears, continue with step 2. |
 |
| To mount a pulley
or gear next to one wheel, it is a good idea to cut
some space for that on your chassis; otherwise, one
wheel will stand out and your model will not have a
symmetrical shape. The size of this space may vary
depending on the size of your pulley or gear.
(3/8" x 1 1/2" cut
is shown in this example) |
 |
| This is how a
pulley or gear may be mounted beside one of the
wheels. The pulley or gear must have a hole matching
the axle diameter and must feet snugly. Some pulleys
and gears require a plastic insert and some drilling
in order to adapt the diameter of the axle you are
using. After mounting, make sure that the wheels can
spin freely. If necessary, mount a metal washer
between the spacer and eye screws. |
 |
Other
methods of mounting the axle
| You may not have
eye screws for mounting the axles. This is an
alternate method for mounting wheels and axle.
Insert the axle in one
wheel, slide a washer onto it. Insert a 5 1/2" straw
over it and finally insert another washer and
another wheel. |
 |
| Your final wheels
and axle will look like this. Hold the straw and
spin the wheels. Make sure the wheels can spin
freely. If necessary, make some adjustments. |
 |
| Cut 4 pieces of 2"
(5cm) long wood strips and glue them about 1/5"
(5mm) apart where you want to mount the axles. |
 |
| Insert the axle in
the space between the strips and secure them in
place using some glue. Cover it with a strip of
cardboard or heavy construction paper. |
 |
| Note that the glue
will touch the straw, not the axle. This is how the
bottom of your car will look like after covering the
axle holder with a strip of paper. |
 |
|
|
Step 2: |
Mount
the motor
| Insert the small
gear or pulley onto the motor's shaft. Place the
motor on the self adhesive motor mount and strap it
securely and snugly. |
 |
| Place the motor on
the car while the car is on a flat surface. Move it
towards the gears until the gears engage. Mark the
location of the motor. Avoid too much pressure on
the gears because it will increase the friction and
make it difficult for the car to move. |
|
| If
you use pulleys to transmit force, motor must be
mounted away from the pulley so that the rubber belt
is slightly stretched.
Carefully peal off
the protective cover of the adhesive pad. Make sure
you will not remove the adhesive pad itself. Place
the motor where you already marked. Push it down
firmly to stick in place.
Mount the rubber band
belt between the wheel pulley and the motor pulley. |
 |
|
|
Step 3: |
Mount
the battery holder
| Place the battery
holder on the car, secure it in place with some glue. Connect the
black wire of the battery holder directly to the
motor. Connect the red wire of the battery holder to
the switch, then connect another small piece of wire
from the switch to the motor. Insert the batteries
while the switch is open. |
|
|
Test the car while
it is still in your hands. Do the wheels spin? In
what direction? If the wheels are spinning backward,
switch the wires around on the motor. Place the car
on a race track and test it.
Does it run on the ground? |
|
| The final pulley
motor
car you make may be different based on the materials
you use, the design implementation and additional
decorations you may add. |
|
| Decoration may
include wooden or cardboard pieces you can add or
paints you may use. |
|
|
Alternate Assembly Procedure for gear driven
solar car
The following steps relate to the construction of the basic
pulley motor
vehicle. Steps relating to the completion of the propulsion systems are left to
the student's discretion.
- Make sure your kit contains the items listed.
- Locate the grid planning sheet in the kit.
- Using a pencil and ruler, design the body of the vehicle and propulsion
system.
Remember, the lighter the vehicle's body, the further it will travel.
- Show the drawing to the teacher when ready.
- Locate the balsawood sheet from the kit
- Transfer the vehicle body pattern to the balsawood.
- Using the craft knife and straight-edge,
carefully cut out the vehicle body.
|
|
- Locate the straw from the kit. Also get scissors and glue
gun.
- Cut straw in half
- Using the glue gun, attach the straws to the bottom of
vehicle, one at each end (parallel to the end)
- Locate the axles through each straw.
- Push one wheel into each axle.
- Insert and axle through each straw.
- Carefully place the remaining wheel onto each axle.
Note: This completes construction of the basic solar vehicle.
- Locate the solar cell Panel and the required parts for the
propulsion system chosen gears, pulleys, propeller, or rubber
band. (Gears are supplied, Pulleys and propellers are optional.
- Assemble and attach the propulsion system as designed.
- Finish your solar racer as desired using paint, markers,
etc.
- Race the assembled vehicle on a flat surface in a sunny day.
| If you don't have this
kit, you can order it now! It is available both as a single
pack and class pack. Kit content may be different from the
images shown in this page.

Secure
Online Store
|
 |
|